What is GSTIN? How to Get One and Why Every Business Needs It
If you've ever received a GST invoice, you've probably noticed a long 15-digit number sitting on it somewhere. That's a GSTIN. And if you run a business in India, there's a good chance you'll need one too, sooner or later.
So what actually is it? How do you get one? And what happens if you're running without it?
Let's go through all of that — plain language, no confusing government jargon, just what you need to know as a small business owner or freelancer.
What is a GSTIN?
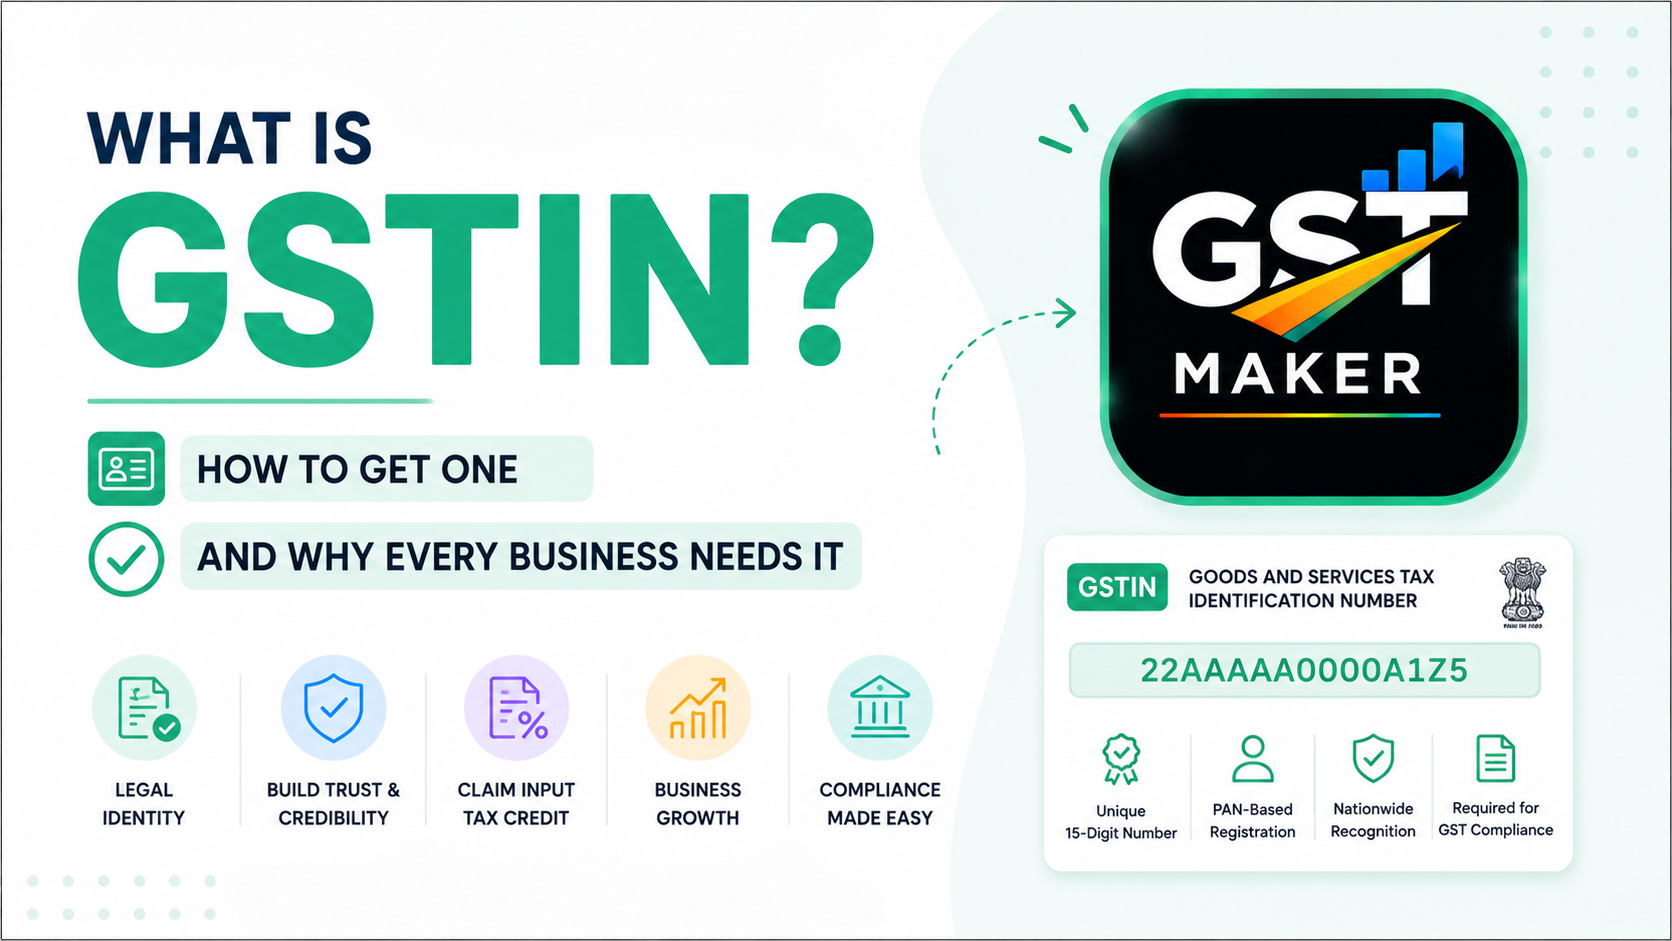
GSTIN stands for Goods and Services Tax Identification Number — a unique 15-digit number the government hands out to every business that registers under GST.
Think of it like a PAN card, but for GST specifically. Your PAN identifies you to income tax. Your GSTIN identifies your business to GST.
It's on every invoice you raise once you're registered, and it's what your customers use on their end to claim input tax credit. Basically, it's the thread that connects your business to the rest of the GST system.
What does it actually look like?
Always 15 characters, and each part means something:
- First 2 digits — your state code (Delhi is 07, Maharashtra is 27, Karnataka is 29, and so on)
- Next 10 digits — your PAN number
- 13th digit — how many registrations you have in that state (usually just 1)
- 14th digit — always Z by default
- 15th digit — a checksum for verification
So a GSTIN like 07ABCDE1234F1Z5 tells you right away — this business is registered in Delhi, PAN is ABCDE1234F. You can also verify any GSTIN for real on the official portal at gst.gov.in, which is worth doing before you take a new client's word for it.
Do you actually need one?
Not everyone does. Here's the breakdown.
Registration is mandatory if: - You're selling goods and cross ₹40 lakh in annual turnover (₹20 lakh in special category states) - You're providing services and cross ₹20 lakh (₹10 lakh in special category states) - You sell on Amazon, Flipkart, Meesho, or any e-commerce platform — turnover doesn't matter here - You supply across state borders - You're operating as an agent or aggregator
Worth registering voluntarily if: - Your clients are registered businesses who need your GSTIN for their own input tax credit - You want to look more established and credible - You're growing fast and know you'll hit the threshold soon anyway
Voluntary registration is completely allowed even below the turnover limit, and honestly, a lot of freelancers do exactly this because their B2B clients simply prefer working with GST-registered vendors.
Getting a GSTIN, step by step
The whole thing happens online, through the GST portal.
Step 1: Head to the portal. Go to gst.gov.in and click "New Registration" under Services.
Step 2: Fill Part A. PAN, mobile number, email. You'll get OTPs on both to verify. Once done, you get a Temporary Reference Number (TRN).
Step 3: Fill Part B using your TRN. Log back in and complete the rest — business name and type (proprietorship, partnership, company), your principal business address, owner/partner details (Aadhaar, PAN, photo), bank details, what goods or services you deal in, and the HSN/SAC codes for them.
Step 4: Upload your documents. PAN card, Aadhaar, proof of address (electricity bill, rent agreement, or property document), bank proof (cancelled cheque or statement), and a photograph.
Step 5: Submit and wait. A GST officer reviews the application, and if it checks out, you get your GSTIN in 3 to 7 working days — by email and on the portal. Occasionally you might get asked to visit the GST office in person, usually just for address verification.
What changes once you have it
You can raise proper GST invoices. Your GSTIN goes on every one. Without it, you legally can't charge GST at all.
You collect GST from customers and pass it on to the government when you file.
You can claim Input Tax Credit. Any GST you've paid on business purchases — equipment, software subscriptions, office supplies — comes back against what you owe. This is actually one of the bigger reasons registration is worth it even before it's mandatory; it can genuinely cut your tax burden.
You start filing returns — GSTR-1 for sales, GSTR-3B for tax payment — monthly or quarterly depending on turnover.
Where GST Maker comes in after that
Getting the GSTIN is really just step one. After that you've got to use it correctly on every invoice, file on time, and keep clean records — which is where most of the actual work is.
Enter your GSTIN once during setup on GST Maker, and it shows up on every invoice from there on. CGST, SGST, IGST — all calculated automatically based on where your customer is. And when filing time comes around, your data's already organized and export-ready.
No manual math, no formatting invoices by hand. Just clean, compliant billing every time.
Last thing — don't let it go inactive
Once you're registered, you need to keep filing returns — yes, even in the months you had zero sales. Miss it long enough, and your GSTIN can get suspended or cancelled, and reinstating one is a genuinely painful process.
Set a reminder for your due dates and stay consistent about it. And use a tool that keeps the whole thing simple instead of adding to the workload.
Ready to start billing with your GSTIN? Head to gstmaker.com and set up for free — your first invoice will be ready in minutes.